
DECEMBER 29, 2013 10 COMMENTS THIS POST MAY CONTAIN AFFILIATE LINKS.
DIY TOY STORAGE TUTORIAL – WOODEN CRATE ON WHEELS
Our playroom makeover for the girls is now officially underway. This is a project that I’ve been impatiently waiting to start since we moved into the house. We bought our house in November of 2011, and we are just now getting around to redoing the room. I can come up with a million different reasons WHY it’s taken us so long to start but mostly, it’s because I’ve been pregnant, and the last thing I wanted to do was start projects I wouldn’t have wanted to finish. Sigh; so here we are. Better late than never I always say.
So little by little it’s all coming together. I’ll be sharing all of our projects for the room separately here on my blog and then do a reveal once the room is completed. Excited!
I have found AMAZING inspiration on Pinterest. You can see my Inspiration board here.
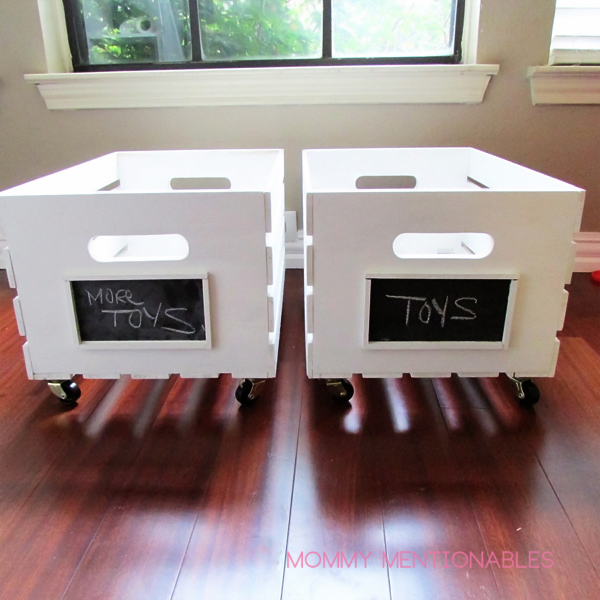
My first mission…to tackle the toys. We have a gazillion toys scattered all throughout the house, different rooms, everywhere. Sometimes it looks like a tornado passed through the house. The playroom was going to be a place to store all the toys but we needed a storage area in the room and we didn’t have a toy box.
I found this really simple tutorial for cute wooden crates as a toy storage here, and I knew I had to make some myself. What I loved about these is the fact that they had wheels. My daughter is always carrying her toys back and forth from room to room, dropping most of them on the way. So I thought the wheels would be great so that she can move the toy box from room to room.
I was able to find some white wooden crates at Joann Fabric & Crafts. Similar to these here – Square Wood Crate
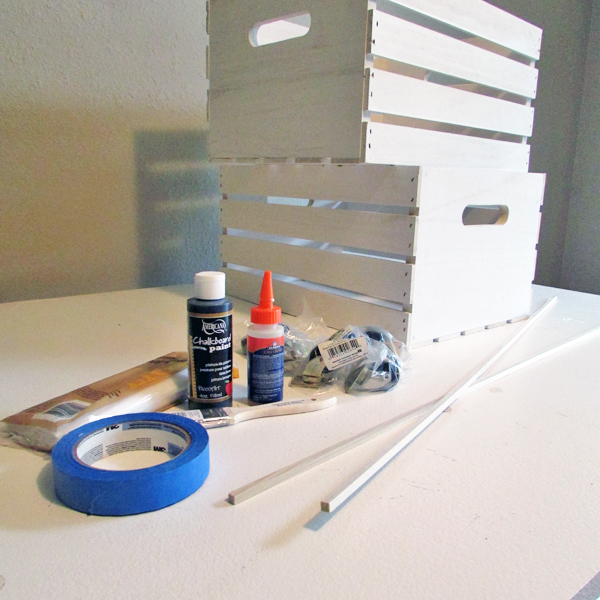
HERE IS WHAT YOU NEED:
Wooden Crates – Joann Fabric & Crafts or other craft store
White Acrylic Paint
Paint Brushes
Chalkboard Paint
Wooden Trim sticks – Lowes
Saw or Dremel to cut trim to size
Screwdriver and small screws
8 small casters (wheels) – Lowes
Wood glue
Painters tape
The wooden crates I found were already white but I went over them lightly with one coat of white acrylic paint.
Next, I drew a rectangle on the front part of both crates. I used a pencil and a ruler to try to get the same size on each.
Then, I taped off the sides and I painted on the chalkboard paint. I did two coats and let it dry in between coats.